Interpolation Add-on Documentation
The add-on supports nearly any video as an input and outputs only to a
.mkv container output for compatibility reasons. All audio, subtitles, and chapters are automatically muxed over into the output video (no additional encoding). Continue reading for a comprehensive documentation of this add-on tool. Basic computer hardware and software knowledge is required to use this add-on. You should also be aware of common video encoding terms so that you can read and understand these instructions without struggle.Selecting an Output Video Codec
The EncodeGUI Interpolation Add-on Tool features four different video codec standards to select from:
HEVC (recommended): The High Efficiency Video Coding standard. Use this codec for a high quality output video with relatively smaller output filesizes compared to other, more popular codecs. Most devices and video players nowadays fully support this codec for playback.
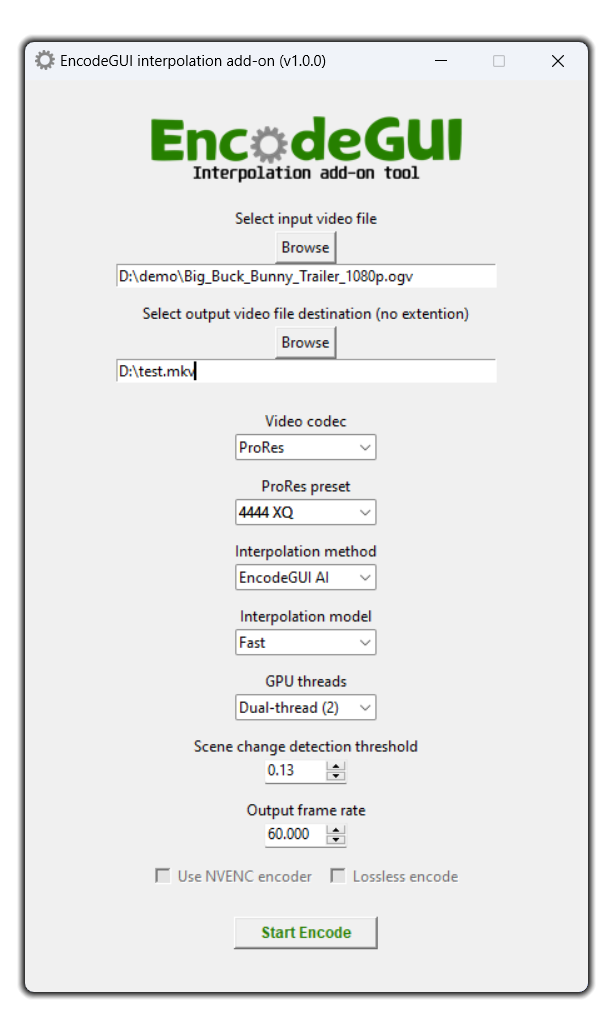
ProRes: The Apple ProRes encoder for a lossless, cinematic-grade encoding output. This codec is ideal to use if the output video intends to be color graded or edited using additonal post-processing software. If this codec is selected, a drop-down menu will appear below the codec menu which will allow you to select a ProRes preset. Select the preset based on the color content of your video (default:
422 HQ).AVC: The most standard codec in existance. The encoding speed of this codec will be highest but the compression quality may not be as great (larger output file sizes). Use this codec if compatibility on other, older devices is most crucial.
AV1: The newest codec standard which provides the highest quality compression than any other codec of these four offered. However, this codec is still relatively new which means most devices and/or video players may not have support for decoding this codec yet. This add-on tool uses SVT-AV1 which features automatic hardware-acceleration for computers with newer Intel processors.
Selecting an Interpolation Method
The EncodeGUI Interpolation Add-on Tool offers three different interpolation methods to choose from. EncodeGUI AI and RIFE are offered in their NCNN Vulkan configurations:
EncodeGUI AI (recommended): An exclusive interpolation method which combines RIFE and SVPFlow to allow a high quality AI interpolation in the output video while also offering a faster rendering speed than a RIFE stand-alone interpolation. EncodeGUI AI automatically determines how many frames should be interpolated using RIFE and SVPFlow in order to provide the right rendering speed based on the selected model while offering an unparalleled interpolation quality in the output video. Due to software limitations, only 8-bit source videos are supported using this interpolation method (10-bit or higher color depth videos are automatically dithered down to 8-bits, then converted back to the original color bit depth during encoding).
RIFE: The Real-Time Intermediate Flow Estimation AI interpolation library. This is the next recommended option after EncodeGUI AI and offers full AI computational models for each render. A large variety of AI models are included to allow you to find the ideal one for your source video. However, only models
v4.0 or newer support the custom frame rate option. Older models (before v4.0) only support 2x interpolation! RIFE supports input videos with up to 32-bits of color depth.SVPFlow: An OpenCL interpolation library based on SVP's real-time motion smoothness application. This interpolation method is the fastest to render, but the interpolation quality is the weakest of the three offered within the add-on. Use this interpolation method if your PC doesn't support the Vulkan graphics backend or if the rendering time is too slow when using the other methods.
Selecting an Interpolation Model
EncodeGUI AI: There are 3 different EncodeGUI AI models to select from:
Fastest, Fast, and Slow. The biggest difference between these three models is the encoding process speed, hence the names. The Slow model allows for the highest quality interpolation in the output video with the least amount of artefacts. The Fast and Fastest models allow a faster encoding process speed at the cost of slight loss of interpolation quality compared to the Slow model. No one model is good as an all-around best setting. Please demo various videos so that you can get an idea of each model's strengths and weaknesses not already mentioned here.RIFE: This interpolation add-on tool offers 12 different RIFE models to select from. The current RIFE models available in this add-on are:
v1.8, v2.0, v2.3, v2.4, v3.0, v3.1, v4.0, v4.6, v4.9, v4.12, and v4.15. There is technically no "best" model since all of theses models cam work differently depending on the video you want to interpolate. Though many enthusiasts believe models v2.3 and v2.4 are the best in general as an all-around solution. If your video consists of scenes with a lot of patterns such as objects with stripes or window blinds, then the v1.8 model is best to use. Currently, model v1.8 is the only RIFE model that does not suffer from artefacting in scenes with various and repetitive patterns. For processes with a faster rendering time, model v4.6 or newer should be used. Those models offer a high quality interpolation for most videos in general while maintaining a fast rendering speed for the process. Just like with the EncodeGUI AI models, take your time evaluating the different RIFE models using various sample videos to help determine further strengths and weeknesses of each model that was not mentioned here.Other Settings
GPU threads (EncodeGUI AI and RIFE only): This setting allows you to select the number of GPU threads for the NCNN interpolation process. A GPU thread count of
1 to 4 can be selected. The number of GPU threads to select depends on the dedicated GPU memory (VRAM) your system has. Select 1 thread if your GPU has 2GB or less of VRAM or no dedicated VRAM at all. Select 2 threads if your GPU has 4GB to 8GB of decicated VRAM. Select 3 threads if your GPU has 8GB to 12GB of dedicated VRAM. Lastly, select 4 threads if your GPU has more than 12GB of dedicated VRAM.Interpolation shader (SVPFlow only): This options selects the shader ('model' equivalent) for the interpolation process. Shader 13 is a genral recommendation. For more information, please see the SVPFlow documentation and see the SVSmoothFps function parameters.
Artefact masking (SVPFlow only): This option allows you to select the artefact masking level applied to the interpolation. The higher the artefact masking, the less smooth the video will be. Turning off the artefact masking will allow the smoothest interpolated video possible but will also introduce more artefacting.
Scene change detection threshold: This value allows you to configure the scene change detection threshold applied to the selected interpolation method (
0.00 to 1.00). When a scene change is detected, no interpolation is performed between the two frames where the scene change occurs. A higher value will result in a less sensitive scene change detection level, but could also introduce more frame morphing on legitimate scene changes due to the decreased sensitivity. Higher scene change detection thresholds are best for videos with a lot of high-motion scenes such as in action films. Use a scene change detection threshold of 1.00 to turn off the scene change detection entirely. A lower scene change detection threshold will result in a more sensitive scene change detection applied to the interpolation method which is most ideal for videos with less in-scene motion and/or where there is little variation between scene changes. However, note that setting a lower scene change detection threshold value could also make the interpolator falsely detect scene changes when a scene change did not actually occur, such as during a high-motion action scene. This will result the video being choppy during the high-motion scene since the frames that are detected are not interpolated.Output frame rate: Use this number box to select the output FPS you desire to have in the rendered output video. The output video frame rate can be either higher or lower than the source video's frame rate, but it cannot be equal. The output frame rate is limited to
10.000 fps for the minimum and 360.000 for the maximum. RIFE interpolation models older than v4.0 are subject to a locked 2x interpolation factor applied to the output video. The total output video frame rate with this interpolation factor considered will be automatically calculated and displayed in this number box.NVENC encoder: This option enables the Nvidia NVENC encoder for the encoding process. This feature is only available to use with the
HEVC and AVC video codecs. It requires a Nvidia GPU with NVENC encoding and decoding support. You will receive an error message during the encoding process if your system does not meet this requirement.Lossless encode: This checkbox enables lossless quality (CRF 0) encoding for the process. This feature is supported with all selectable video codecs except for
ProRes With this option turned off, the encoding quality is automatically set to CRF 16 (except for ProRes) for a visually (simulated) lossless quality output video while also keeping the output video file size lower. Lossless quality encoding is supported for NVENC-enabled processes, but is a simulated lossless qualty (CRF 1) since NVENC does not officially support a true lossless quality encoding mode.